The daybook is one of the more advanced accounting tools in Shine. You should therefore only use it if you have experience with accounting from more traditional programs, where almost all accounting is done via a daybook, or if you follow one of our other articles, which show you step by step what to do. If you have questions about the daybook or this review, please contact our customer support team.
The meaning of the daybook
If you are knowledgeable in accounting, the daybook is the tool in Shine that you will be able to work with the fastest.
Here you have the opportunity to :
- Create transactions without having to create an invoice or bill from scratch.
- Create more distinctive and advanced transactions that our more user-friendly accounting tools, the invoice and bill module, cannot handle.
The daybook from A to Z
The daybook is a classic accounting tool, where debit/credit is paramount.
- The first field to fill is the voucher number:
- The voucher number is automatically consecutive and will follow the same voucher track as the invoice module if the voucher number field is enabled under Settings > Program settings.
All transactions in the daybook will be given a voucher number and a transaction number, which you will subsequently be able to find under Accounting > Transactions.
All transactions in Shine will be given a transaction number, regardless of whether they are posted via the invoice or invoice module or via the daybook.
- The next fields are the date field and the option to attach a voucher:
- We always recommend that you attach a voucher to what you post in the daybook. This will make it easier for you to find the voucher later if SKAT or your accountant has questions about it.
- Next comes the text field, where you indicate what the transaction covers.
- Then you select which account you want the amount to be posted to.
- If you select a VAT rate in the VAT field, the entry will automatically distribute the amount specified in the debit or credit field to the correct accounts and possible categories.
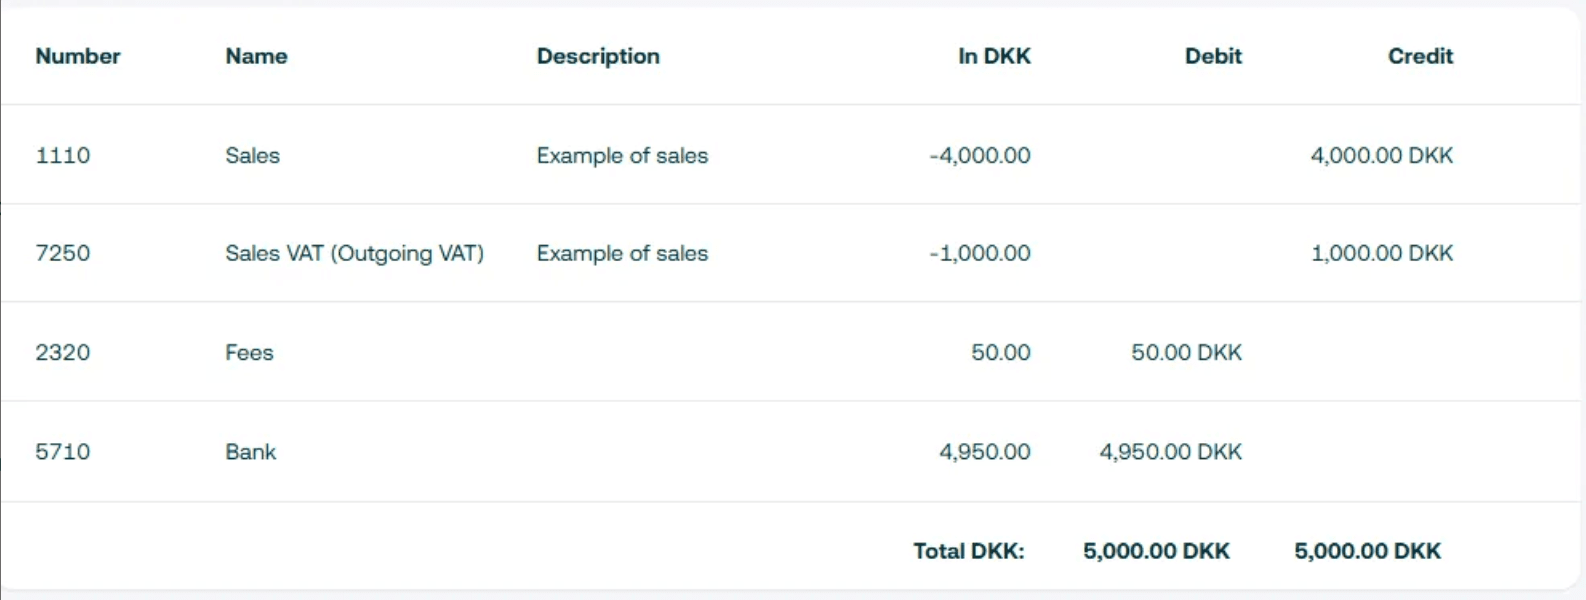
- For example, if you indicate that you have an sales of 5,000 with 25 % VAT, the program will distribute 1000 to the VAT-account and then the fee for 50. Which means that there will be 4950 payout in your bank.,
- Then you select which account you want the amount to be posted to.
- If you select a VAT rate in the VAT field, the entry will automatically distribute the amount specified in the debit or credit field to the correct accounts and possible categories.
- For example, if you indicate that you have an sales of 5,000 with 25 % VAT, the program will distribute 1000 to the VAT-account and then the fee for 50. Which means that there will be 4950 payout in your bank.

Once all the fields have been filled in, you can approve (post) the transaction by checking the box to the left of the voucher number and pressing either Approve or Approve all.
- You also have the option to copy or delete the transaction line and add a line to the transaction if it is a multi-leg entry. You will find these functions under the arrow to the right of the Offset account field.
Once it is approved it will look like this:
Shortcut keys in the daybook
The daybook contains a number of shortcut keys that make it faster and easier to post multiple and/or repeated entries:
- Next/previous field:
Tab/Shift+Tab - Copy daybook line:
Ctrl+D - Delete daybook line:
Ctrl+Delete - Add line to multi-leg entry:
Ctrl+L - New entry (when in the Offset account field):
Down arrow
Daybook Settings
Under Cash Journal Settings, you have the option :
- To change the name of the daybook;
- And specify a default offset account. By specifying a default offset account, the selected account will always be suggested as the offset account for the transaction created in the daybook.
This option can therefore be an advantage if you are in the process of updating your bank account or another account in the system.
In addition, you have the option to add balance accounts so that you can continuously monitor the status of these accounts while you are posting in the daybook.
If you have any problems or questions, please do not hesitate to contact our Customer Support at the e-mail address: support@shine.co.